Saturday, October 25, 2008

Revit Tip: Poche walls

Poché walls

I was working on schematic plans recently, and ran into a design dilemma. We wanted to show the existing columns and walls as solid black entities.

Revit will allow you to do this when you have demolition plans.


I want to do this, but I am not phasing the project yet. Instead, I can create a new wall type for the poché by duplicating the one I want.


I will edit the structure of the wall.


Open the material of the main structure of the wall.


Duplicate again, this time it’s the material. This way any other walls or objects that use this material don’t get affected by our little change.


Now I get to make it work. We are just going to change the cut pattern to Solid Fill and make sure the color is Black.


There you have it. I also did this with my columns to help them read a bit heavier in the schematic portion of the project.

Wednesday, October 22, 2008

Revit Tip: Worksets

Worksets

A little recap on the username and workset issues some of you may be running into.

Remember, anytime that more than one worker needs to use a file at the same time, you will have to have worksets. Once worksets are enabled, these are tracked through the use of your username.


To access your username, just go to the Settings menu and select Options.


This menu is accessible both with files open and not open, but you will need to close open files in Revit if you want the changes to take effect on the file you are working on.

If you create a local file, then you will always need to open this file as the original user. Otherwise, you will not be allowed to save changes.


When working on a file, you will check out portions of the project so that other users are not being counter-productive.


This menu will help explain why you might not be able to edit a portion of a project.


It is possible to grant a request.


But if you have changed anything, you have to Save to Central for those changes to take effect and allow the other user to get them.


So, the most effective method that we have found is for both workers to Save to Central and relinquish control of all worksets.


Both users should then Reload Latest, and this will resolve any issues.

Monday, October 20, 2008

Revit Tip: Edit Witness line

Edit witness line

One thing I hated for a long time was dimensioning in Revit.


Sure it was much easier than in AutoCAD, but every time I miss clicked, I wound up with my dimension string too short.


Then, if I wanted the dimension string to be one element, and I do (it must be the OCD), I would have to redo that long run of dimensions. This sometimes would result in my doing the same thing again and again and again.

Wait! You mean there is a way to fix that one string to include more dimensions! Why didn’t anyone tell me about it?

Don’t worry, I will share. It’s that Edit Witness Lines thing again.


Just click and add more dimension string to the end of your existing line.


Click as many times and to as many things as you want. It will all be tied to the same dimension element.

Wednesday, October 15, 2008

Revit Tip: Central File

How to create a new central file of a project

You need to make a backup of your central file often. These can become cluttered and have a greater potential for crashing. It is also a good idea to make copies of the project during design phases when a major change is being made to the project. This is a simple process if completed correctly, and can be an onerous task if not.

The first method is to make a local file the new central file. Open your local file, with the correct username, and choose the Save As menu.


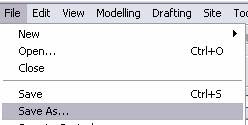
You will want to navigate your way to the location of the current central file on the server.


Choose Options from the bottom corner of this menu.


Oh my god! (I am sure you don’t hear my daughter exclaiming this as my father tells her about the possum that they had on their deck a few years back, but it’s great.) There is something about making this the central file.


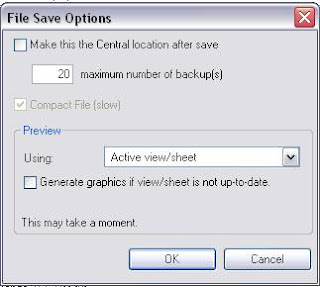
Check this and save your file to the server. Everyone working on the file will need to make new local copies, but this is the easiest and fastest way to make a new central file.

You might be tempted to simply copy and paste your central file on the server from Explorer.


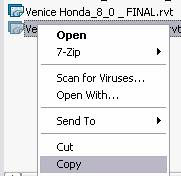
I wouldn’t suggest this, as Revit seems to know or not know if the central file has moved or been renamed. Best not to tempt the fates.


Another safe method to make a new central file is through the Open command.


Here we will see a very helpful feature for this use, the Detach from Central box.


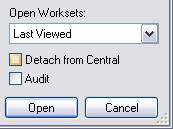
If we check this box when opening a central file, there will no longer be any problems tying one file to another. We can safely Save As with this file onto the server and use the method above for making this the new central location.

This is not meant to be a substitute for creating new projects! Don’t do it, it’s a bad idea!

Monday, October 13, 2008

Revit Tip: Worksets

Central files and local files

Revit files are the hub of all the information contained in a project. When users start a new file, this file is the only file all the information is contained there. If you move or copy the file on the server, there won’t be any warning messages or problems. Without worksets enabled, your Revit file will act like any other file type you know of; only one person can work on it at a time.

For multiple people to work on a Revit file at the same time, you need to create a central file. To create a central file, you need to enable worksets. This is done by clicking the toolbar button for worksets. This should be grayed out when you start a new project.


This action starts a whole process where Revit places all the created elements in your project onto a workset. Be careful, this can take awhile and it’s best to save a copy before running the process.

Once worksets are created, you have a central file. You will know worksets are on if the toolbar is in color.


Now multiple people can edit the file at the same time. First, everyone needs to make a copy of this file on their local drive to work on. To do this, just open the central file on the server. It should be named something similar to below.


This lets everyone know that this is the central file and not to mess with it. With it open, just click Save As and make a copy to your local D:\ drive. It’s a good idea to save this file with your initials in it to help differentiate it.


Now, when you work just open this file and make sure to Save to Central often.


This menu is good because it allows you to save both the local file and the central file at the same time. It also tells you what file you are linked to on the server in the Central Location heading.


In a future tips we will talk about several other topics related to central files including worksets and ownership. I will also tackle the dreaded creating a new project from an old project copy to new location or did I move it and did we screw up the last project or are we making a mistake by using this archaic form of file transfer method for starting a new central file from an old file and not using a template instead issue.

Sunday, October 12, 2008

Revit Tip: Template

How to start a new project

Always start a new project from a template file! These files are different from Revit files because their file extension is .rte and not .rvt. They are specifically designed to be used as a starting point for a new project. You will also never run into a problem with central files, local files, and usernames.


This method prevents you from bringing along a bunch of stuff you don't need, want, or that might even be old or wrong.

That's it. No more tip for today. Never copy a project to start a new one, never ever do it.

Friday, October 10, 2008

Revit Tip: Levels

Levels

Blue dots vs. Black dots


Don't know what the difference between the blue level dot and the black level dot is? Don't worry, I will help enlighten you.

Anytime you create a new level, Revit will generate a floor plan and ceiling plan associated with this new level.


This new level will show up in every elevation and section you work in from now until forever. No way to fix this unless you delete the level. Wait! This will give you that nasty error about a level being deleted.


This ominous error warning means that Revit is going to do things you may not like. To avoid this problem when you want to add levels, copy them instead.


This will give you that Black dot level instead of a blue dot.


It will function just the same as a regular level, but without the error warnings and extra views. You can still set the base and top of a wall to this level.


And when you delete or rename the level, no warnings!

Renaming levels that are created also changes all the associated views.


Not so with copied levels.

This is a great tool for adding a constraint to the project without adding a lot of extra views, i.e. top of parapet, bottom of soffit, etc.

Wednesday, October 8, 2008

Revit Tip: Linework Tool

Linework tool


Problem

Sometimes an elevation needs a little tweaking to look 100% correct. Revit will show too much information sometimes, and we need to tone down the amount. For instance, these walls are all the same exterior finish, so they should show as one continuous material.


Solution


Use the linework tool to edit the way lines look. We just need to hide the common edges of these walls. Run the command and the first thing you should set is the lineweight you want to use.


This will give you the option of selecting any of line types that we already have loaded into our drawing. It also has several predefined settings for specific types. The one I want is in brackets < > and says Invisible lines.

Now I just hover over the line I want to hide and click on it. Use TAB to cycle through elements if needed.


Because there are two walls at this location, I have to select the edge for each one, which requires two clicks to completely hide the line.


Now my elevation looks the way I want it to. This technique will work for any of your drawings that have more information showing that you need to hide. It will also work the opposite way if you want a line to show up bolder than it normally will.


Or you can use it to show something as dashed.


The key point is that you are still working with modeled elements in your project. You don't need to draw filled regions to hide elements or linework. It also means that if anything shifts or changes in the drawing, it will require less work on your part to show it clearly.

Just remember Revit is here to help you move away from 2d drafting and into the BIM revolution!